Sunday 29 January 2017

Minerva Makes: Metallic top and scuba leggings

Hello all! My latest project has a little of the party and a little of the practical about it. As a student I find myself 'going out' at the weekends to various pubs, bars and clubs with slightly nicer than normal dress codes. There isn't really anything in my wardrobe that I feel quite fits the bill, and I thought that this metallic fabric would fit the bill perfectly. You can read all about the making process here.
Thanks for reading, to Minerva for the kits for this outfit and to Edward for taking the photos!
Lauren xx

Monday 23 January 2017

Batwing top patten hack, Sew Style, Essentials bookazine feature

 Hello all! Today I'm excited to share that I was in Sew Style's latest bookazine with a pattern hack. I started off with  Kwik Sew 3720 as a base pattern which is a basic batwing top.
I decided to really go for gold with the hacking and chop the pattern off at the waist, add a circle skirt and raise the batwing sleeves slightly. I'm really pleased with the resulting dress and I really think it demonstrates how versatile you can be with  a basic pattern.
The fabric is from Minerva Crafts and although I didn't think it was very me when it arrived, it's really grown on me. Plus, it's really soft and cosy to wear.
When I chopped the bottom of the bodice off, I failed to take into account the weight of the skirt, so next time I'd shorten it a bit in anticipation of that. I also didn't anticipate the fact that the elastic would stretch out when I sewed it to cinch in the waist, so next time I'd either cut the elastic shorter or make a channel with it to run through, instead of sewing it directly to the fabric.
I really like the length of the sleeves, although they are a tad impractical. At the time I cut the skirt as long as was possible, and I'm undecided on whether to shorten it or not.
Thank you very much for reading, to Sew Style for letting me feature in their bookazine and to Edward for taking photos!
Lauren xx

Sunday 15 January 2017

Lark sweatshirt

Hello all! Today I have another Lark to share with you. You may think that you have seen this fabric before, and you would be correct. Dad went into the local fabric shop just before Christmas and bought me the same fabric that he did for Christmas last year! I made a pair of trousers from last years fabric, but they never got a lot of wear, so I was glad of another chance to do this fabric justice.
I decided to make a Lark, cropped sweatshirt style with cuffs and a bottom band ending at the waist. The fabric is a woven with a weird amount of lengthways stretch, as opposed to the traditional horizontal stretch and perhaps I was a little optimistic that the lengthways stretch would be enough to make the Lark tee.
It turned out alright I think, for the gamble I took. The sleeves are a bit short and a bit tight, and the band around the waist is just a little too short for these jeans. It might be worth just quickly sewing a smaller seam allowance on the sleeve and ripping off the band and adding a slightly longer one.
I do really like this jumper and I think it would be worth doing the alterations to make sure it gets worn. I can see myself wearing a black shirt with it and I love it with black jeans.
Thanks for reading and to Edward for taking photos!
Lauren xx

Sunday 8 January 2017

Tutu!!!

Hello and a very Happy New Year to you all! Research was part of my dancewear module at uni and I couldn't help but want a tutu after seeing all of the gorgeous ones in my studies. I decided that the romantic tutu's are my favourite. They were popular in the romantic era, hence their name and were cut just above the ankle so that the dancers footwork could be admired.
Luckily my friends were having a fancy dress party for their birthday so I could make my ballerina dream a reality! If I was to make a romantic tutu properly it would be attached to a basque but I wanted mine to wear over the leotard I made last year so I simplified the process a lot.
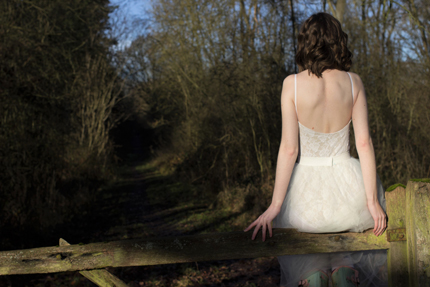
I ordered 2 metres of tulle from eBay hoping that with a long width there would be enough fabric. This was then cut into 3 equal pieces and sewn into 3 tubes with an opening left at the top of each seam so I could get it on. These tubes were then gathered to my waist measurement and sewn onto a bleached calico waistband which is fastened with a giant snap.
I wasn't at all happy with the fit of the 
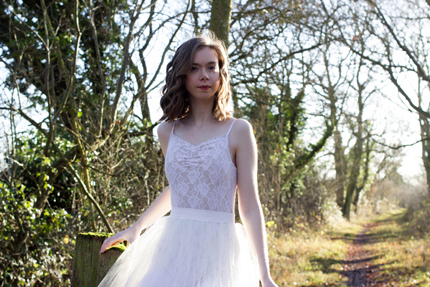
leotard so I made a few drastic alterations. The first was to cut a straight line at the neckline, cutting off the straps which always dug into my arms. The neckline was looking a bit baggy so I zigzagged a piece of foldover elastic down the wrong side of the centre front to ruche it a bit, which I think looks great.
I curved the underarm seam down into the back and used foldover elastic for the straps. The result is a lot more comfortable than the original. Don't look at the finishing on the inside though. That leaves a lot to be desired.
I was really quite happy with the overall effect for the party, but there really aren't enough layers of tulle to make a proper impact. One day I'd like to add at least another 3, or maybe scrap the waistband and do it all properly. It is very hard to find  information on making a proper romantic tutu though. All the tutorials are fashion based because it seems that tutus were all the rage a few years back.
It was very fun to wear, I must admit. An outfit such as this really requires a person to float around with shoulders back!
Thanks for reading, to Beth for letting me borrow her dance tights, to MK for the fabulous party and to Edward for letting me drag him to the woods for photos.
Lauren xx