Saturday 29 October 2016

Noelle / Lady Skater mash up

Hello all! I'm going to take you back in time to a Friday just a fortnight past. My uni was hosting an open mic that very evening and I had 'nothing to wear'. I had plenty to wear, but nothing just right. I wanted something kind of edgy but still very me, the fabric needed to be in my stash and I only had a few hours before lift off.
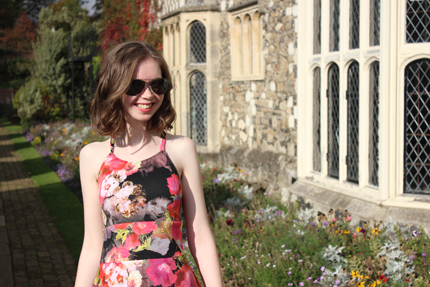
Luckily I had the perfect fabric in the stash. This was one of the fabric pieces I scored at Rosie's Instagram destash. I think the colour scheme is just fantastic. I only had 95cm x 95cm and I wanted a dress, so I had to be a bit creative with the design.
I used Madalynne's free Noelle bra pattern for the bodice portion of the dress. My only alterations to the pattern were to extend the side seams a bit to allow for less stretch in the scuba than the intended fabrics, and lengthened bottom band pieces to make it finish at the waist. I ended up taking all of the excess side room that I added back out again. The length was perfect though.
For the skirt I used the bottom half of the Lady Skater dress which I have used on countless occasions. It's fantastic for having a good amount of volume whilst also not taking up a lot of fabric.
Once I'd figured out how to get all of my pattern pieces onto my fabric it was a rollercoaster ride to the end. Almost. I finished the neckline and the armholes with elastic, which I then turned under and topstitched with a zigzag, just like how I would with a bra.
The clock was ticking and I only had the straps to go. It was there that I hit the snag in the proceedings. Scuba straps do not like being loop-turned. They just would not co-operate. I ended up having to unpick my loop, fold the raw edges around the elastic and topstitch. It was too late in the day for pins and so I regret to say that the width of each strap is drastically different. I went with the optimistic hope that everyone at the open mic would be too drunk to notice/care.
I had just enough time to slather some lipstick on and rush out of the door. Luckily scuba doesn't do hems.
Thanks for reading and to Ed for taking pics when he came down to visit!
Lauren xx


Friday 21 October 2016

October Minerva make: Red, blue and stripes

Hello all! My latest Minerva make is a double whammy. I've been looking for the perfect navy and white striped knit for yonks and yonks and yonks, and as soon as I saw it on their Instagram I knew it would be included in one of my kits. Then I had to decide what I wanted to pair it with. In the end I decided to go classic red pleated skirt for that timeless silhouette.
You can read all about these makes over at Minerva.

Thanks very much to Minerva Crafts for the kit and to Lucy for taking the photos!
Lauren xx

Sunday 16 October 2016

Leopard print 118 shorts

A while back my good friend Ieuan asked me to make him some 80s 118 style leopard print shorts and I was happy to oblige him, for a small fee of course.
The fabric is a polyester knit from Minerva Crafts, although I can't find it on their site anymore. The fabric was very slinky and quite see through so I underlined it with a nice soft cotton jersey. I used this stretch bias binding for the first time which was an adventure.
I started with a basic short pattern, shortened it considerably and curved the side seams. In retrospect, I might have curved them a little too drastically. I planned to topstitch the bias binding into place but when I tried it was stretching more than the already sewn side making a very ripply seam. So I unpicked that and handsewed a large proportion of it in Starbucks instead. I used the white jersey for the waistband so it would co-ordinate nicely with the bias binding.
I gave Ieuan a little questionnaire to answer so you can hear about these shorts from his perspective. Enjoy!

What inspired you to commission a pair of 80s leopard print short shorts?
Who doesn't want a pair of leopard print short shorts.

How do you feel about your shorts?
I love 'em. Dream Pair of shorts.
Are they comfortable?
Top Notch, keeps you cool in hot weather because they are shorter than your average pair of shorts.

How is the fit?
Marvellous, they hug me in all the right places (especially round the genitalia area;) which means no inappropriate slips.
What would you change about them?
Zebra print silk on the inside, to make these bad boys reversible.

Were they a worthy investment?
Most definitely...
Would you recommend them to a friend?
Yes. Of course. Very practical. Good for lunging and other sports, but also incredible for when you want to come home after a hard days work and want to light the stove, feed the Labrador, whack on the kettle and tune into Gogglebox.

Score out of 10?
Due to these being completely out of this world of amazingness, I hereby award these leopard print short shorts in the style of 118 118 running man... an outstanding 10/10. That's a bingo.

Signing off me, the one and only, highly esteemed,

Ieuan Newman

Professional Lunger/short shorts wearer
Thank you for reading and a thousand thanks to Ieuan for being such a good sport.
Lauren xx

Sunday 9 October 2016

Kelly Anorak

Hello all! Today I am very excited to present to you my tester version of Closet Case Files' latest pattern; the Kelly Anorak. I was over the moon when I got the email asking me to test because I've wanted to make a jacket like this for forever.
My original fabric choice was this super cool flour resist dyed cotton that I prepped last year, but when I got it out it was just too lightweight. More dress weight than coat weight. I remembered Carolyn mentioning something about shower curtains a while ago and so I had a look on Amazon and when I found this penguin shower curtain I knew it was the one.
I bought 2 of them so I could be sure that I would have enough, which worked out to about £17 for them both. When they arrived I realised that I would have a nightmare pattern matching the lines of penguins and decided to make the sleeves, zip plackets and the centre of the hood sans penguins. If I'd worked that out before I bought them I would have bought 1 penguin shower curtain and 1 white one which would have saved me a bit of money.
I am very happy with how the penguins are on the back, and less so with the front. The nature of the pockets meant they were impossible to match with the penguins underneath. The yoke and centre row of penguins work well though. I ordered the zip when I was still thinking of using the purple fabric, but I really like the pop of colour it gives. It was the most expensive zip I've ever bought, so it had better last forever. It cost £6 including postage!
I did mess up a bit when I cut out and so my zip is the men's way round instead of the woman's. Though, if you read the instructions before you cut, it is very clear. The construction of the zip is one of my favourite parts of this coat. It just looks so professional.
I must admit, working with a shower curtain as a main fabric was a bit of a disaster. I spent ages doing various things to get the creases out because ironing was not an option. None of my methods worked, but the creases aren't so noticeable in the end. I couldn't pin or unpick, which was a nightmare when it was time to sew the pockets on. Oh, and the pockets are my other favourite part of the pattern by the way. So good! I ended up using blue tack to stick the pockets down while I sewed them. It worked alright, but it wasn't great.
The other major issue I had with the fabric is that it has no give whatsoever, which was a bit of a disaster when it came to setting the sleeves in. One went in better than the other, but I had to settle with doing little pleats, just to get them to fit in each armhole. The fabric is quite see through, so instead of doing a facing I just turned the edge and topstitched. I did have to do a lot of clipping to get it to turn but it worked out alright in the end.
The saving grace of this fabric is that it doesn't fray. That meant that instead of doing flatfell seams I just sewed right sides together as usual and topstitched the SA down. I didn't fancy hammering grommets into this fabric so I opted instead for stick on Velcro. Worked a treat. I plonked it on the hood,  cuffs and to keep the pocket flaps down and I might still add some to keep the zip placket down.
I think that this anorak is quite possibly one of my most favourite makes. I loved that it challenged me with new techniques like the pockets and the zip. It's one of the makes that no one quite believes that you've actually made. Sadly I'm not sure how much wear this fabric is going to withstand. The fabric is already a bit ripped along the pockets. I would love it to last forever though. I definitely want to make a red duffel winter coat version, sizing up to fit some more layers underneath, without the drawstring and with some nice toggles. I'd also like to make a floral version for spring.
Thank you so much for reading, to Heather Lou for asking me to test the pattern and to Lucy for taking the photos!
Lauren xx

Sunday 2 October 2016

The Joseph Dress

Hello all! I have something fun to share with you today. Freshers week has just finished at my uni and one of the events was a dress up party. We all had to dress as something beginning with the letters R, B or C, because my uni is called Rose Bruford College. I had a couple of ideas, ranging from cowboy to clock, but when I looked through the fabrics I bought at this years Sew Brum it was obvious. I had to be a rainbow.
I bought five metres of a poly fabric at Sew Brum in five different colours for a fiver. I chose green, turquoise, purple, red and navy. They were intended for 5 little cami tops in different colours that would go with everything.
I still wanted to use the fabric after it was used for the costume so all of the sewing was done along the edges of the fabric and no cuts were made. The orange fabric was leftovers from some harem pants I made for a friend for the same night. (He won the prize by the way!)
The sewing was very very simple. I tied the corners of each colour together at the shoulders, measured how deep I wanted the neckline to be and then inserted the orange panel at the centre front. I then measured how deep I wanted the armholes to be, and then sewed down the rest of the edge of the fabric for a side seam. All in all this dress only took 5 straight lines of sewing.
I used the selvedges for the necklines so they didn't have to be finished, and hoped that everyone would be too drunk to notice the lack of hem.
Then the tent dress was cinched in by a fantastically 80s elastic which I tied round my waist for a belt.
When I twirled up to my housemate's room for her to examine it she noticed that the rainbow was not in order, so I unpicked the side seams and swapped the turquoise and purple round with a cheeky French seam. Then I just had to sew back up the side seams and everything was politically correct.
It is funny that even though this dress is such a quick and simple sew, just how much of a statement it makes. We got quite a few funny looks when we walked down the meadows for pictures.
It worked very well for a night for dancing and fun and I'm happy that I can rip each piece of fabric back to its original state and make what I intended.
Thank you for reading and a massive thank you to Abby for being such a wonderful picture-taker and director. Also thank you to Kristen for letting my hijack your walk with blog photos!
Lauren xx